console.git(versionControl)
tl;dr
Confused by version control, Git, or GitHub? I was too, but here's the breakdown:
- Version Controlhelps track changes to your files so you can collaborate, roll back mistakes, and manage your code like a pro.
- Gitis the tool used to handle version control locally on your machine.
- GitHubin an online platform where you can host and shar your code, collaborate, and even publish websites for free using GitHub Pages
In this post, I walk you through:
- Creating a git repo from the terminal
- Pushing your code to GitHub
- Publishing a simple website via GitHub Pages
If you’re just getting into dev work, want a refresher, or need a guide to setting up your portfolio, this is for you. I also share real examples from my own projects and workflow to make it less intimidating.
Let’s git you started.
🔗 Bookmark-worthy if you want to return later!
what the git
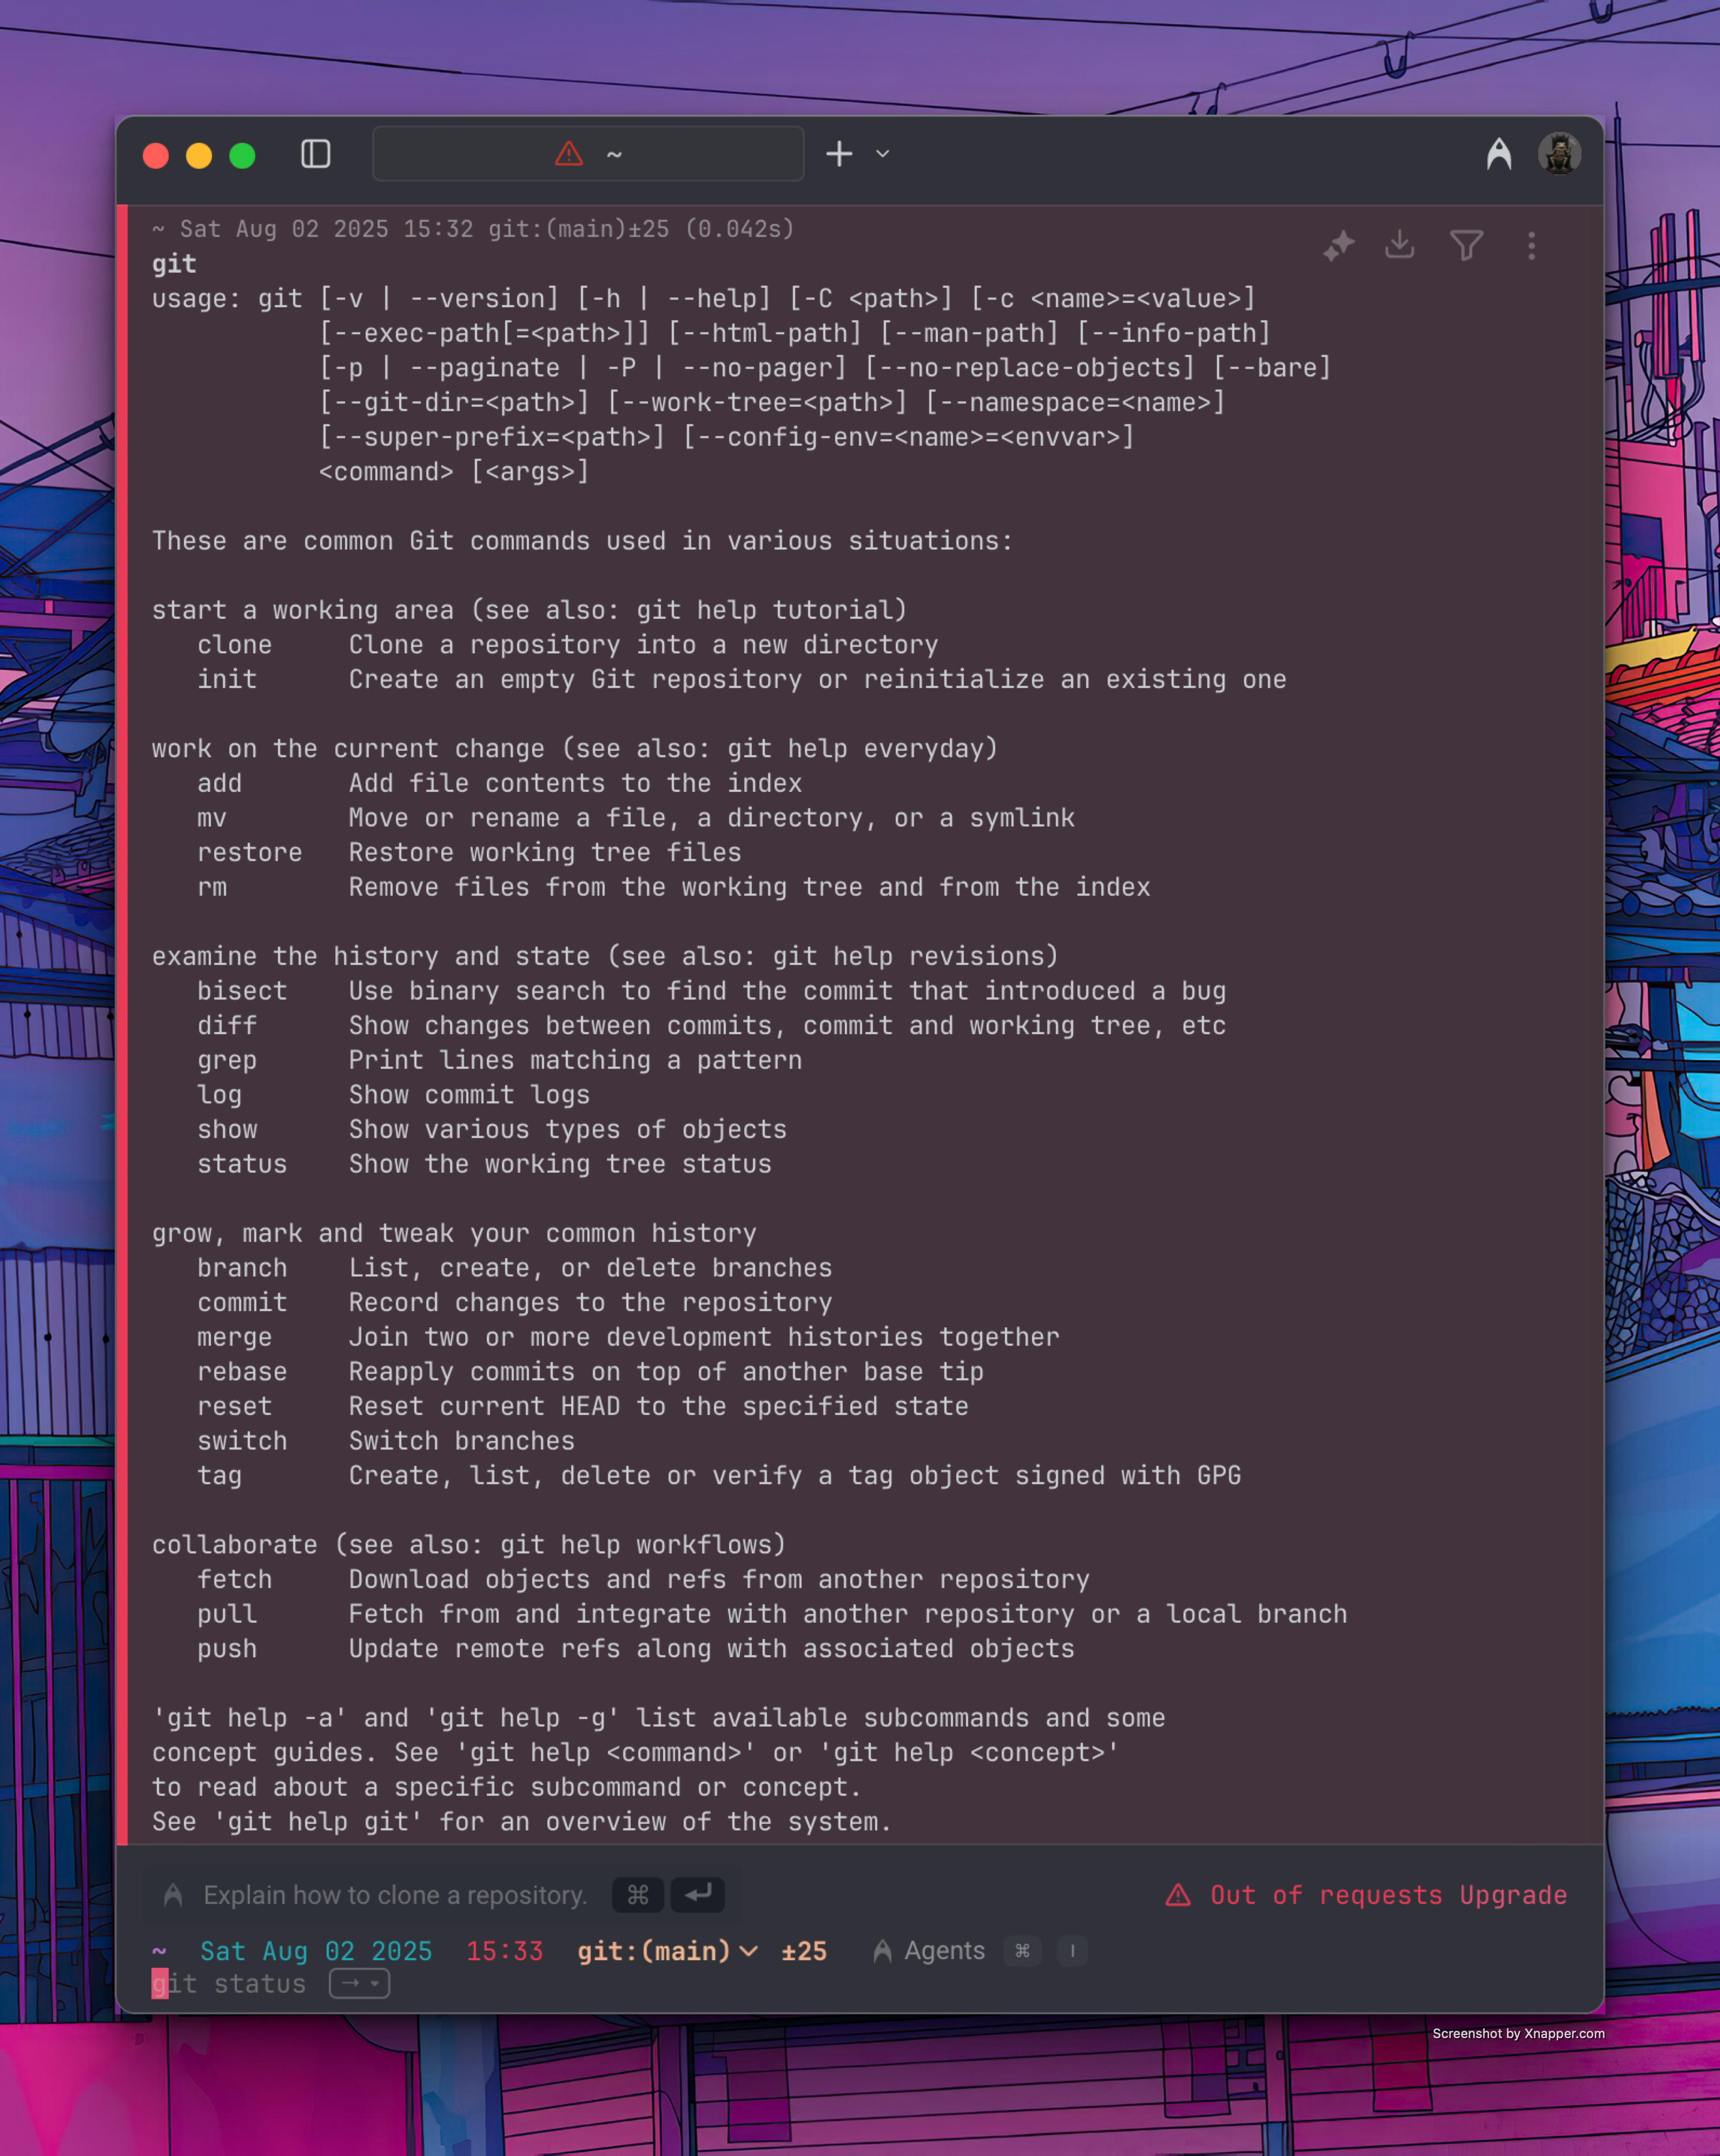
This is what the terminal looks like when just type git as the argument
Version Control. These two words confused the absolute shit out of me in the beginning of my journey. What does version control even mean? I'm so happy you asked!
Version control is a system that records changes to files over time. It allows multiple people to collaborate on a project, track changes, and revert to previous versions if needed. Key concepts:
- Repository (Repo): Storage location for projects with all files and history
- Commit: Snapshot of changes with descriptive message
- Branch: Parallel version for developing features safely
- Merge: Combining changes from different branches
- Conflict: Contradicting changes that need manual resolution
Git is a version control system that tracks/manages changes to all file types. Primarily used for large dev teams working collaboratively on software projects, but works great for small teams or solo devs too.
Instead of sharing individual files manually, you use a repository containing your project's files and version history.
Since you seem inquisitive, here's GitHub explained:
- GitHub is a web-based platform using Git for hosting and managing code. Key features:
- Remote Repositories: Online hosting for collaboration
- Pull Requests: Merge requests with team review/discussion
- Issues: Track bugs, tasks, enhancements
- Forking: Personal copy for safe experimentation
In this post, we'll cover creating repositories locally through the command line with Git, plus doing the same on GitHub's web interface. As a bonus, I'll show you how to set up GitHub Pages to host your repo as a free website (how I host console.log!).
I'm collaborating with Codecademy devs on a secret project (shhhhh), making this perfect timing to demonstrate repo setup.
If you're an aspiring dev, bored dev wanting a refresher, or just curious about Git/GitHub, this is for you. By the end, you'll be able to:
- Create repos from terminal using Git
- Set up GitHub repositories
- Host webpages through GitHub Pages
- Better understand version control's importance
Note: This post assumes you have Git installed and a GitHub account set up. If not, check out the resources section at the end for help.
So without further ado, let's git into it!
git on with it
It is decently likely that you, like me, have come across a GitHub repository or two in your life. And I bet you too were curious what this was. I got somewhat acquainted with GitHub back in March when I got a SteamDeck (I did some customization on the software side and used a couple different repos for it) so when I saw it pop up again when I was doing my dev studies it peaked my interest.
When I decided to start this blog I did a cursory google search for “free hosted blog sites” and GitHub pages came up. This made me dive into that and learn more about what exactly all of this was about. I originally assumed it was a cool way to just share files and applications with others in an open-source way. It is much more than that it turns out.
When I decided to use GitHub Pages for console.log it felt like a floodgate of knowledge was opened to me. It made sense that version control was necessary to keep track of changes over time to a project. Especially if that project is code related. Being able to go back to a previous version of your code because it is broken now is nothing short of god-like behavior (that’s why we’re all into this right? Just a bunch of heathens 😉).
If this is your first foray into version control, Git, or GitHub, I promise this is far easier than it seems! Remember, when in doubt, check slack overflow or do a quick google search. There will always be answers to your questions!
git güd
I need to make a disclaimer, if you were hoping to learn how to install git through the command line, then you are going to be sad but also happy. I will not be going over how to do that as it is different for each OS. I will however link to the git install guide here for how you can do this for your specific OS. Now, lets assume you have git installed and your terminal open. How do you make a repository?
Luckily, from here on out it is the same whether you use bash, zish, or other types. the following code will be the commands you need to initiate.
cd /path/to/your/project
if you have not created a project folder yet then use the cd /path/to/your/project and replace with the path to the folder you want to create a repository in. replace /path/to/your/project with the actual path to your projecct. Once there, do the following if you have not created a project folder yet you can use the
mkdir my-project && cd my-projectThis will create your project directory and then take you directly into it. Replace my-project with whatever you want your project to be called.
git init
This will initialize a new .git folder in your project directory. Your folder is now a git repository!
git config --global user.name "your name"git config --global user.email "your.email@example.com"
Replace "your name" and "your.email@example.com" with your GitHub username and the email assoiated with your account.
git add .
This stages all files in the current directory. To add a specific file: git add filename.txt, or whatever file type you are wanting to make (e,g,. git add index.html).
git commit -m "initial commit"
This saves your changes with a descriptive message. Always make sure to use a meaningful commit messages.
git status
OPTIONAL - shows the current state of your repository, useful for seeing what files are staged or modified.
git log
This shows the commit history for the current branch, allowing you to see past commits and their messages.

This is what the commands look like in the terminal
extra credit(optional)
- connect to your github repo
- go to github.com
- click the "+" → "new repository"
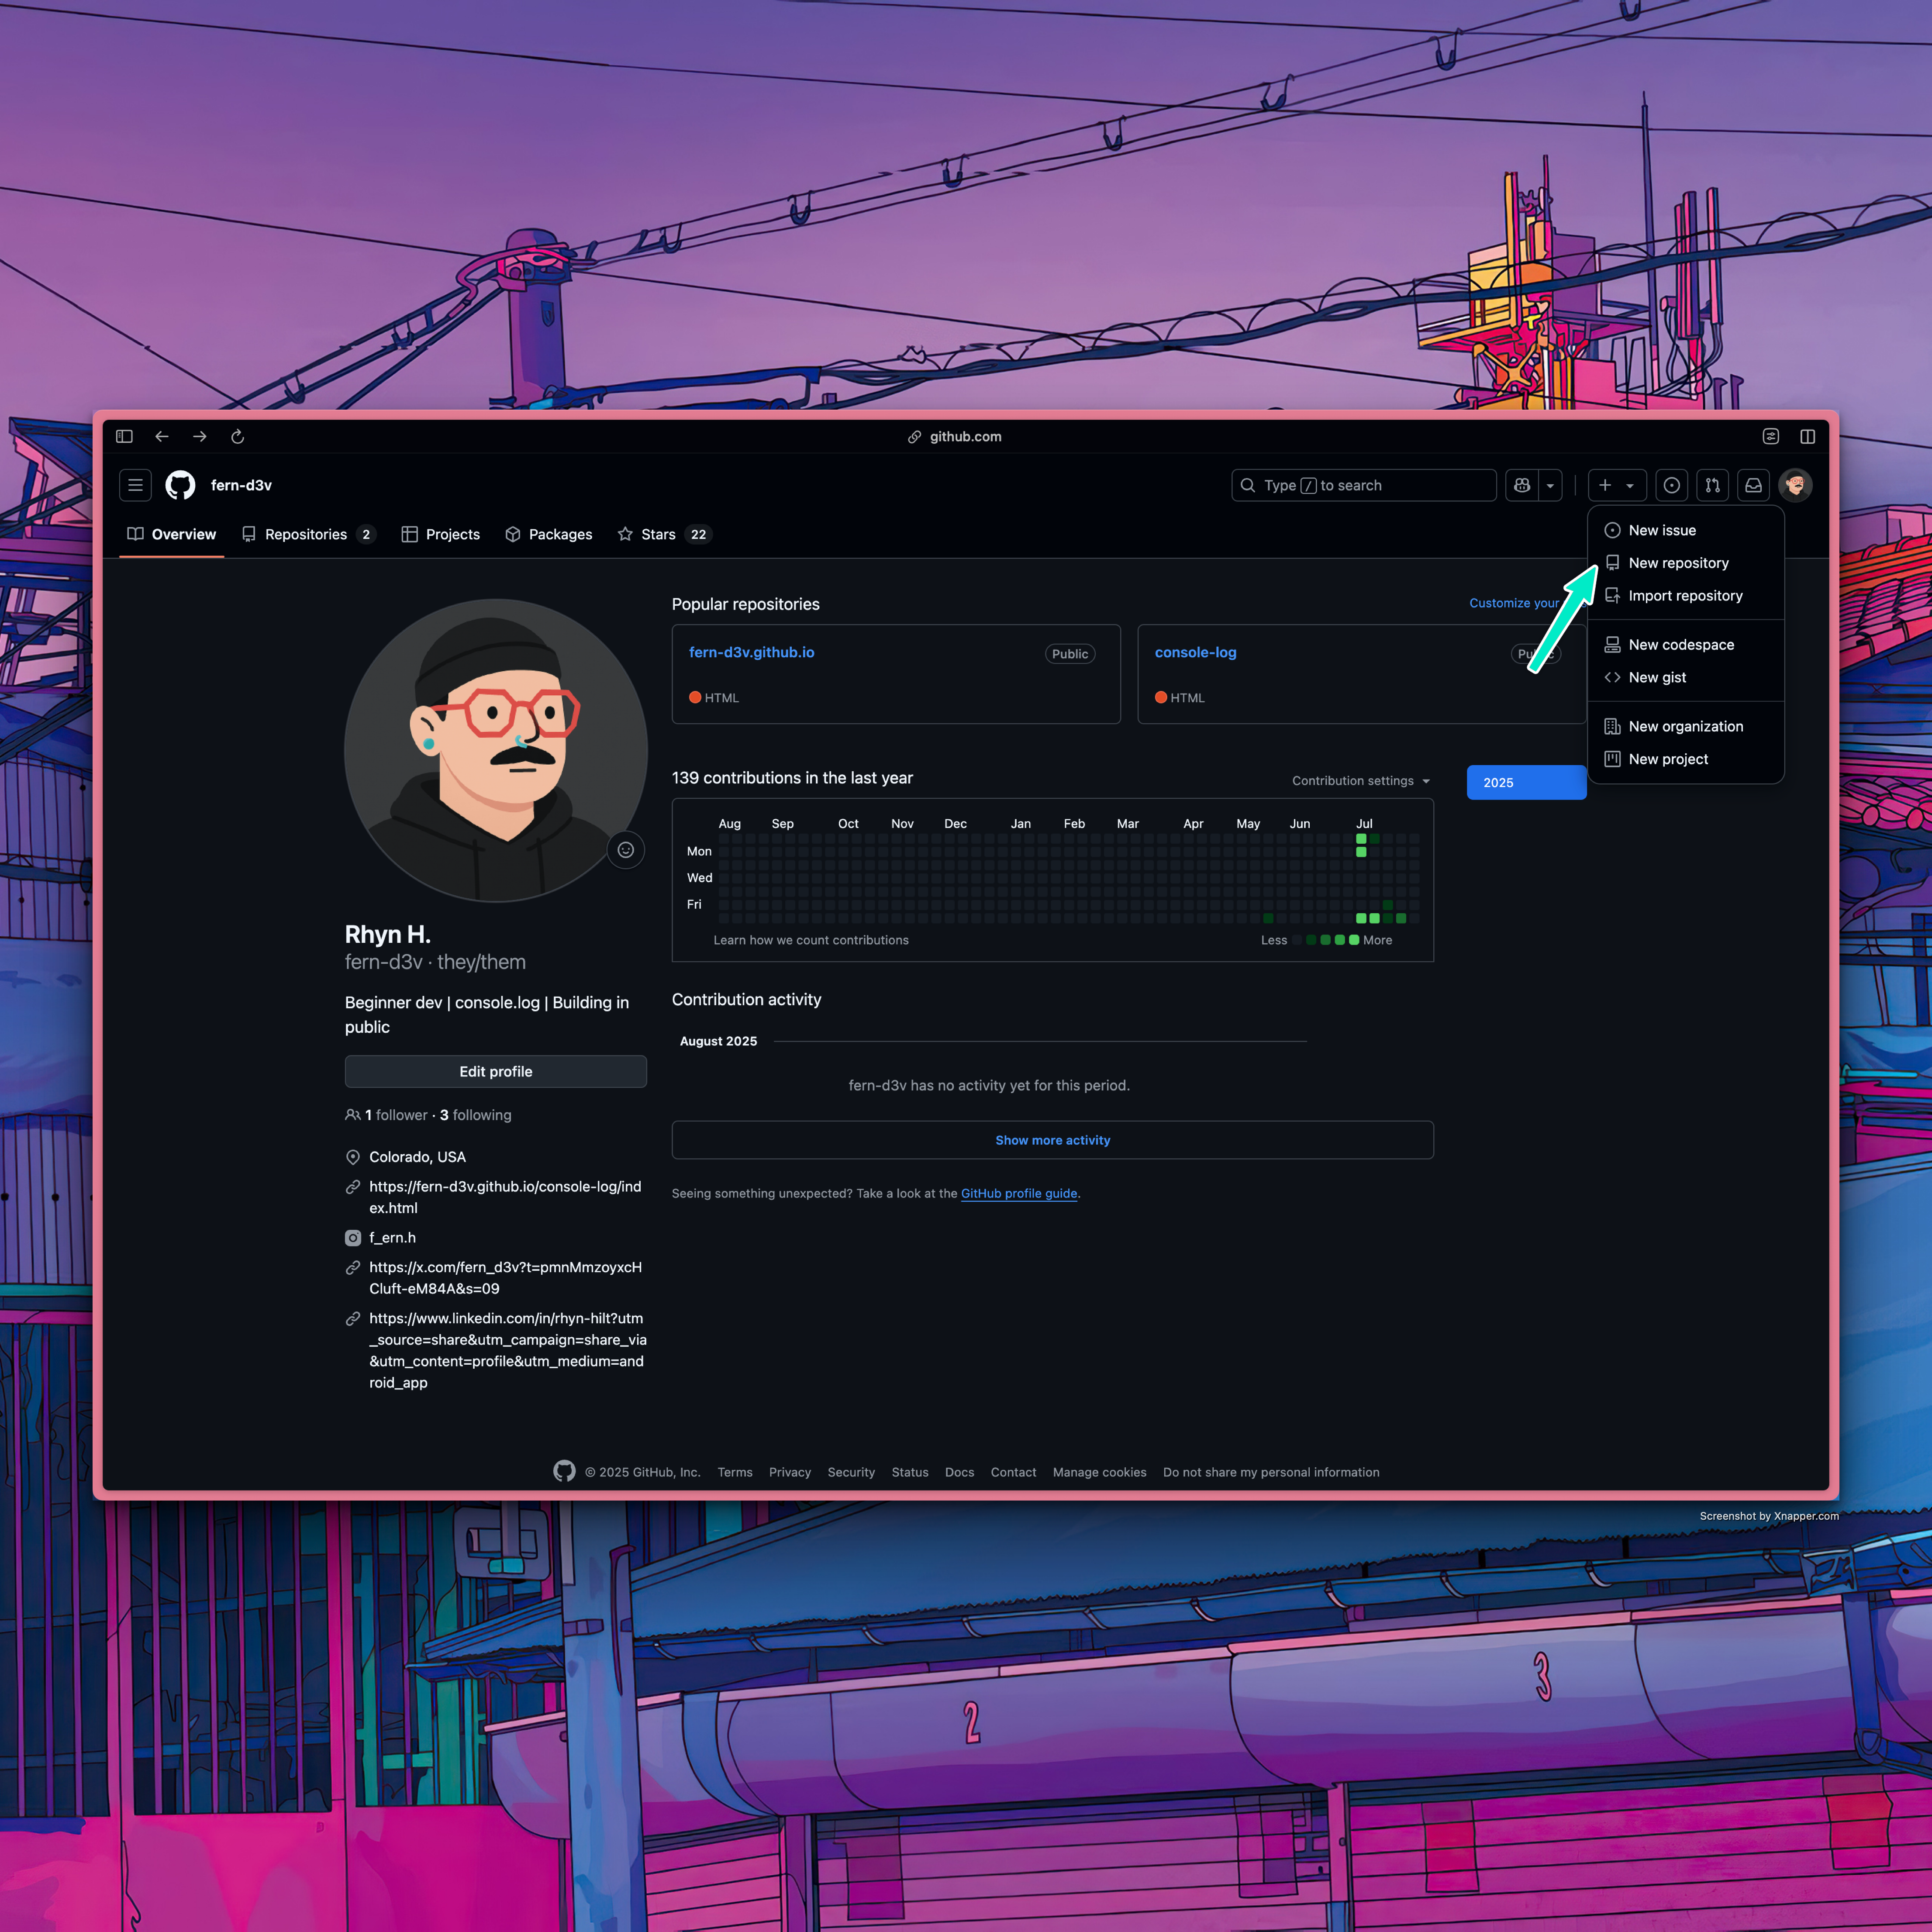
This can also be done from the main github page
- name it the same as the local repo you just created
- choose public/private
- choose public as this is required to make the “pages” work later
- DONT check any boxes (README, .gitignore, license)
- Click “create repository”
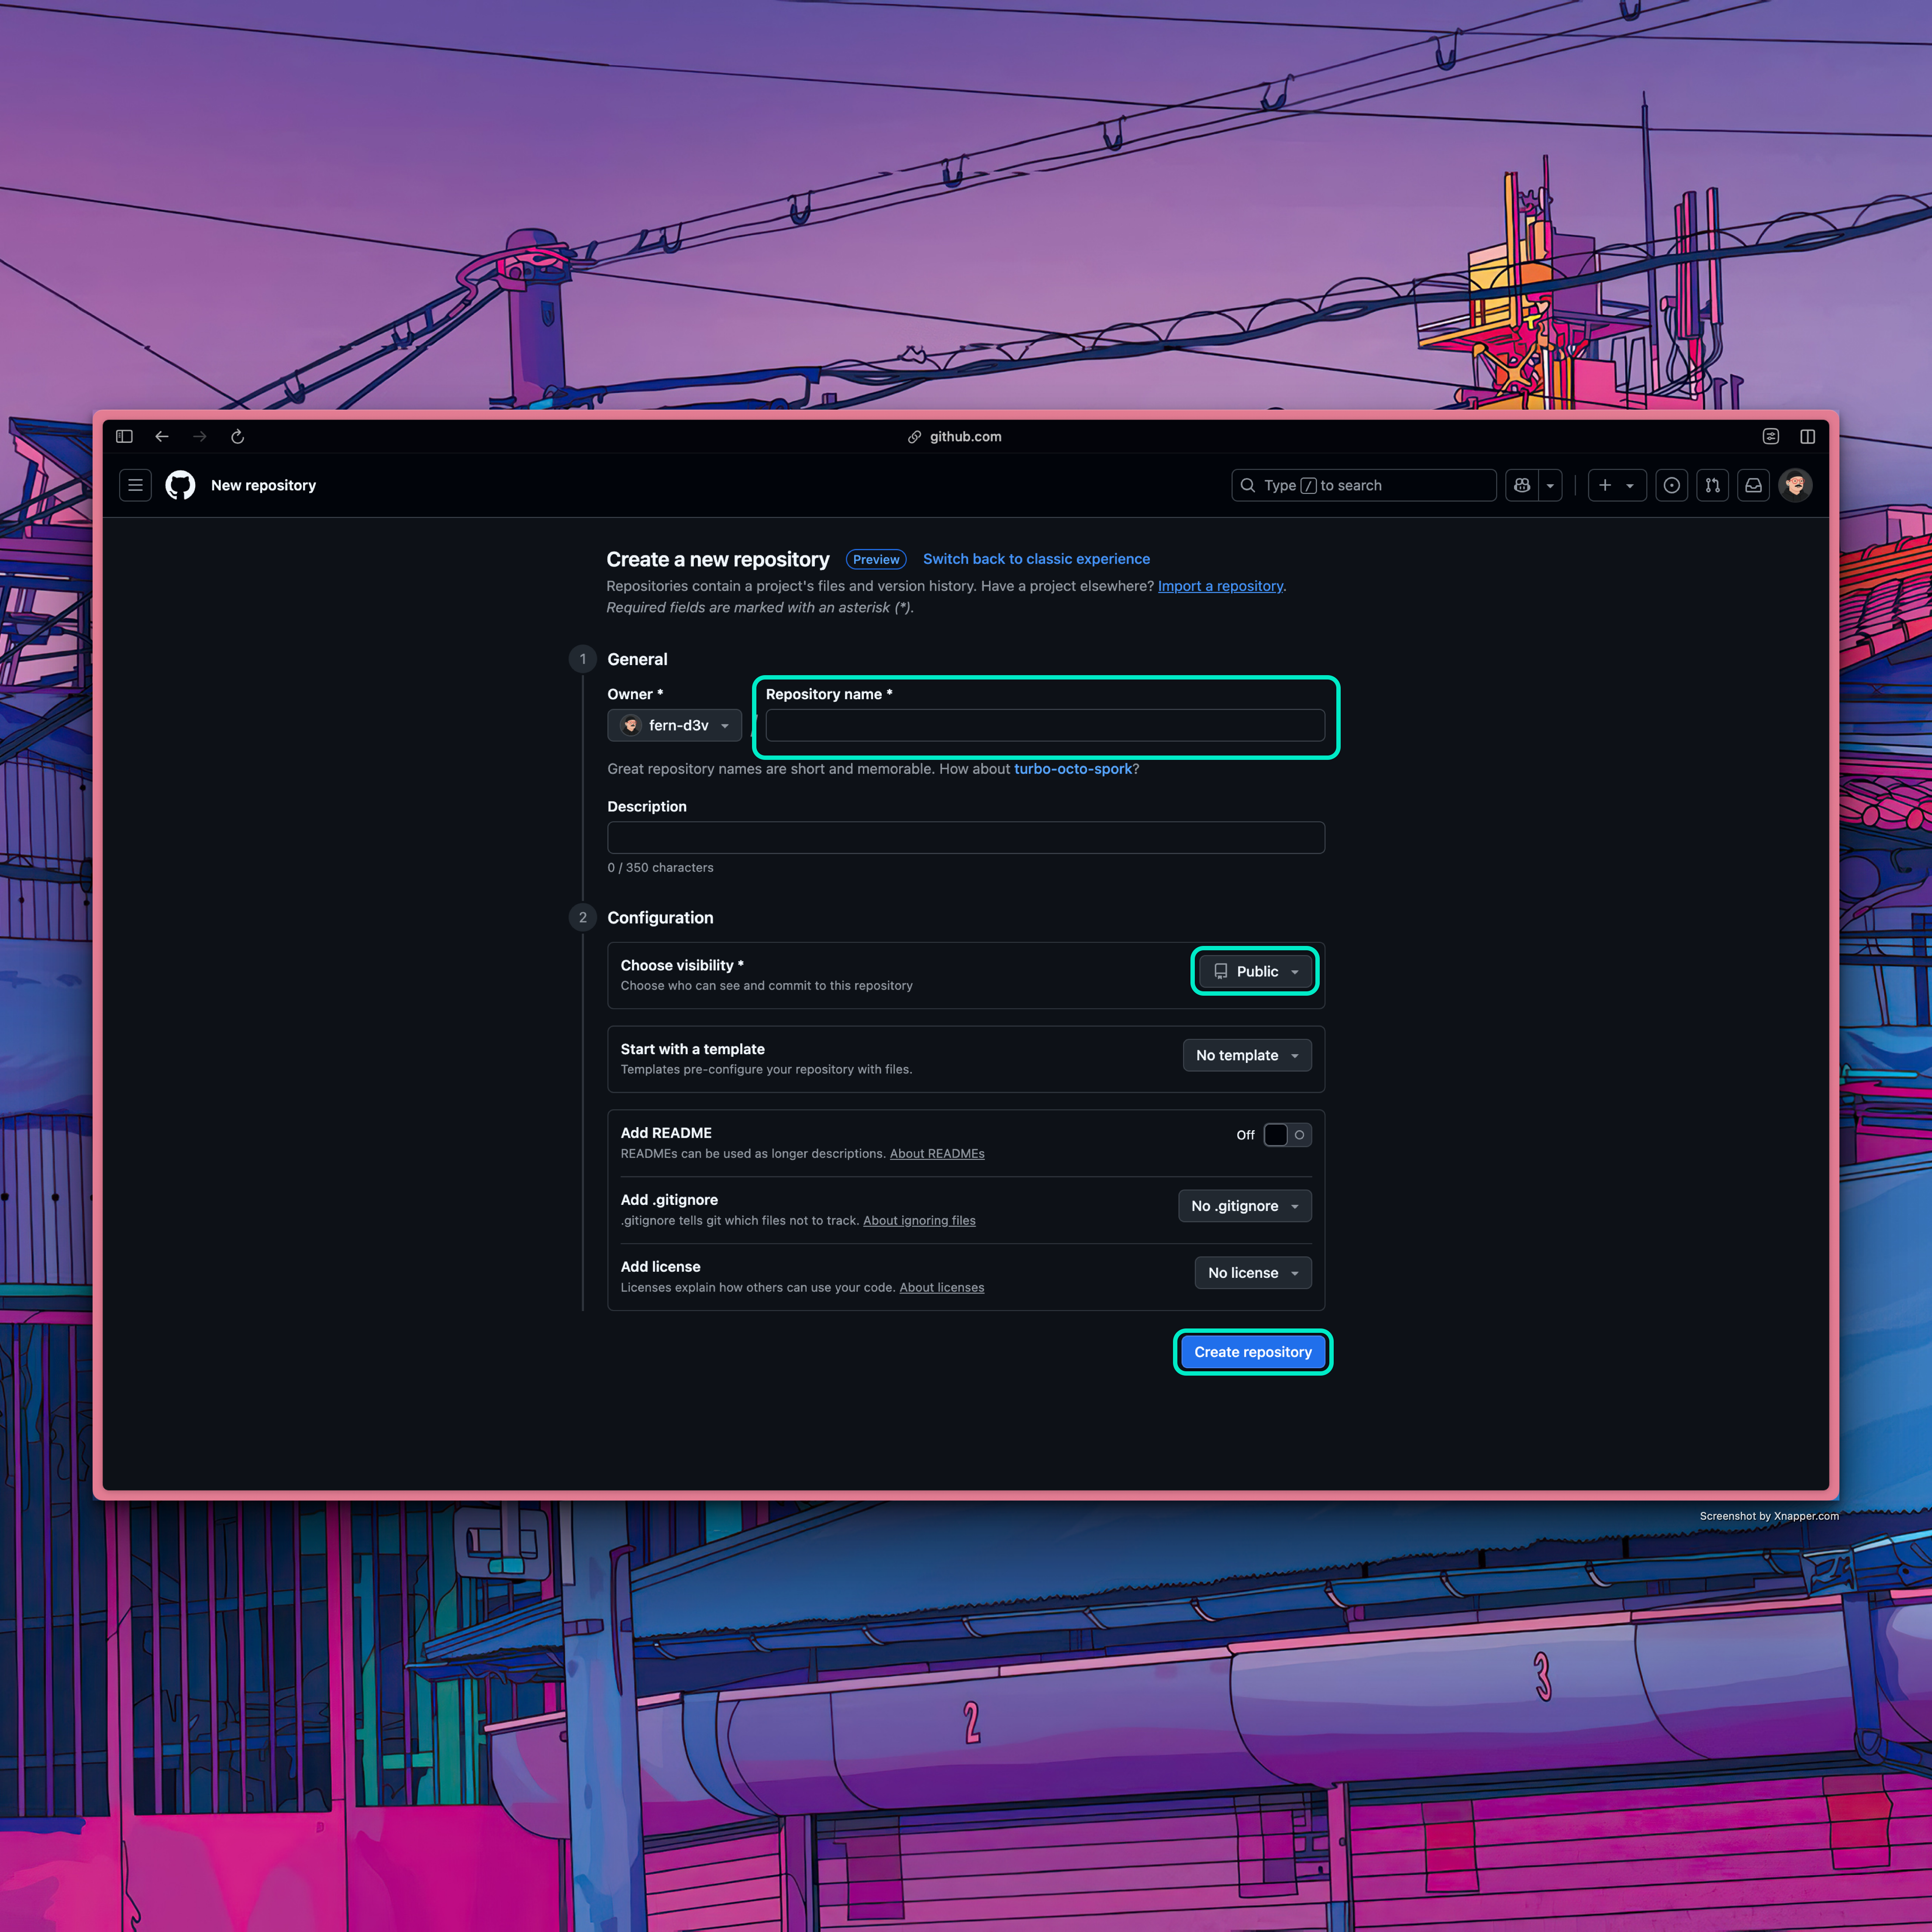
it is VERY IMPORTANT to make the repository public
Now you have a remote repository on GitHub! To connect your local repository to the remote one, ren the following command back in your terminal.
git remote add origin https://github.com/yourusername/your-repo-name.git
Replace yourusername and your-repo-name with your actual details
Now you can push your local changes to the remote repository using the following command:
git push -u origin mainLastly, if you get any errors, run:
git add .gitcommit -m "First commit"git push -u origin mainAnd that’s it! You have successfully created a Git repository, made your first commit, and pushed it to GitHub!
Now you can start collaborating with others, track changes, and manage your code like a pro!
For any future updates you can use:
git add .gitcommit -m "your commit message"git pushgithub pages
- Navigate to the GitHub Repository you just made online
- make sure the privacy is set to public
- Create Your Website Files
- create an index.html file as your homepage
- add css, javascript, and other assest as needed
- you can use plain html/css or a static site generator like Jekyll
- i will not be going over jekyll as this is not something i know yet, but maybe we will go over it in the future together!
- Basic HTML Structure (Example)
inside the index.html paste:
<!DOCTYPE html>
<html>
<head>
    <title>Your Name - Personal Website</title>
</head>
<body>
    <h1>Welcome to My Website</h1>
    <p>This is my personal website hosted on GitHub Pages.</p>
</body>
</html>
- Commit and Push your changes
git add .
git commit -m "Initial website commit"
git push origin main
- Enable GitHub Pages
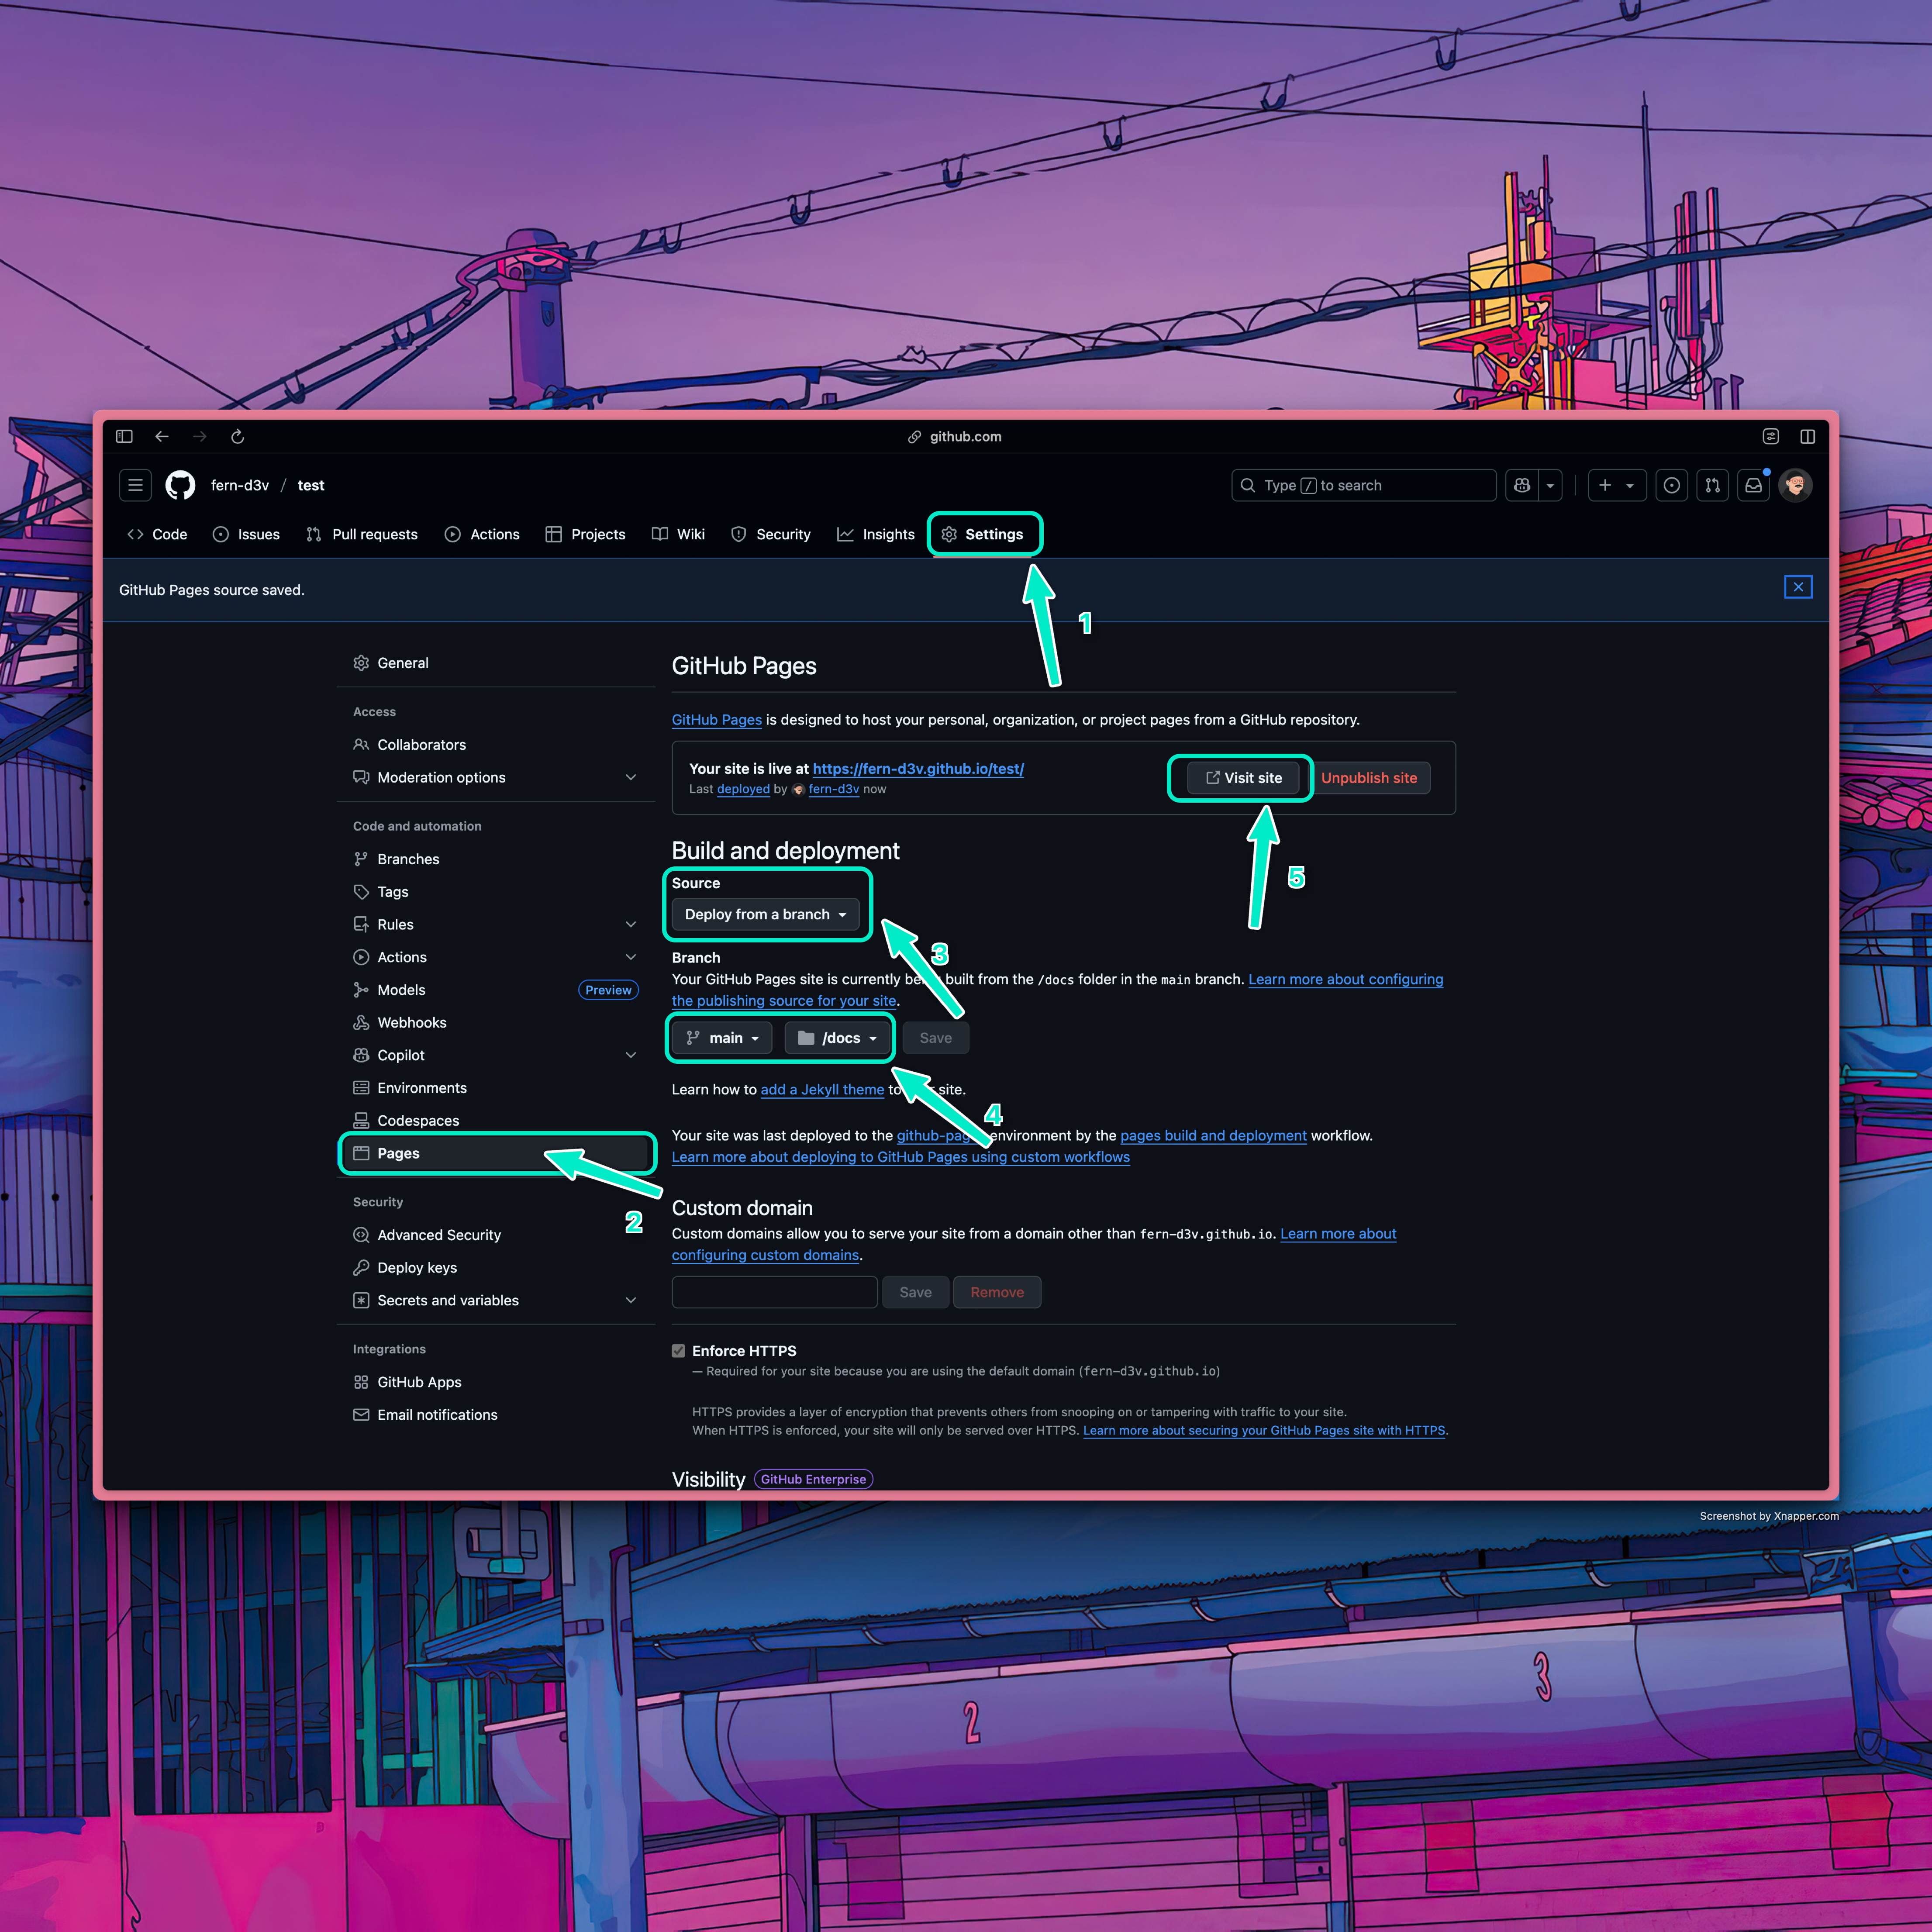
This is where you can enable GitHub Pages for your repository
- Access your website
- your site will be available at https://yourusername.github.io
- it may take several minutes to become active
- CONGRATULATIONS! You just made your first website!
If you use VS Code, I highly recommend using the built in git commit tools as they speed things up since you can do it directly from your IDE.
git = good
Thank you for sticking with me if you made it this far! We went through a lot, I know, but now we have a solid base for how to set up a repo and files, how to commit the changes to files and push them, and how to set up pages in your github repo so you can use it as a website.
Make sure to bookmark this page so you can come back and reference it whenever you need to! If you want to share any cool repos you have on github message me on x or instagram! Or if you just want to say hi that would be cool too!
You are now one step closer to getting everything ready for a portfolio site, a static project, or anything in between. If you know JavaScript you can make a webapp, if you know Python, well, same. The sky is literally the limits with Git and GitHub Repos.
Going through this taught me a lot about how I function as a dev. I am not a terribly patient human and some of these steps take a little bit of patience. If you stick through it though, you will be rewarded with feelings akin to finally defeating Promised Consort Radhan in the Elden Ring dlc (don’t worry, im trash at those games, they are just my favorite to play).
I plan to continue to use git and github to host my projects so I can continue to build in public and hopefully one day contribute to the open-source community in a positive way! Just today actually I initialized a new repo through the command line on my computer just to make sure I knew what I was talking about for you guys. This will be the repo for my open-source app that I want to build. I am not sure what it is going to be. I want to start with a vanilla JS stack and maybe from there learn swift and kotlin and make mobile apps as well.
next up
how javascript is breaking me and making me a new dev